HomeAway - Escapia Connection Instructions
Step 1: Request Partner Connection
In this step, contact HomeAway to request the VRScheduler partner HSAPI connection in your dashboard.
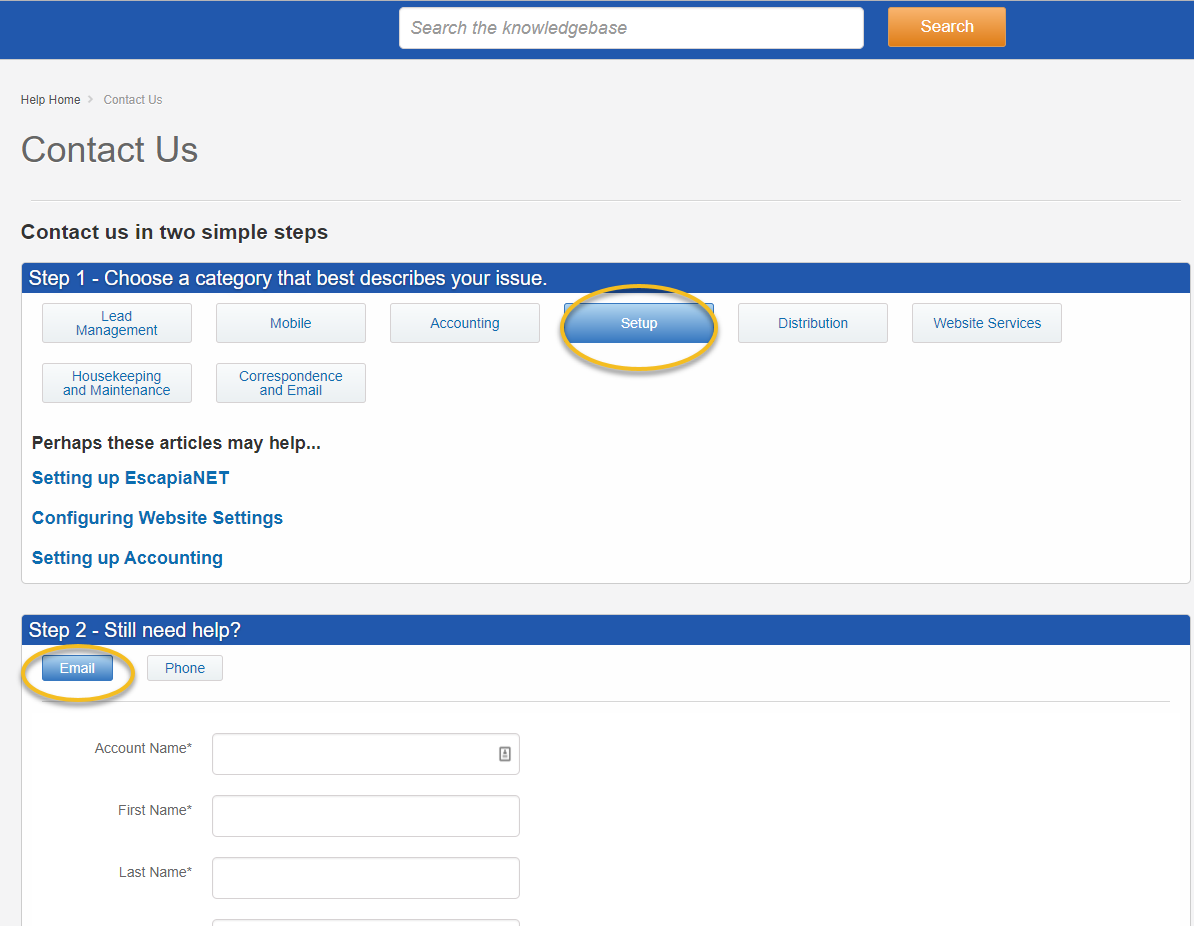
- Navigate to the HomeAway Contact Page:
Escapia Clients: http://support.homeawaysoftware.com/Escapia/contact - From the support portal, choose Setup then Email:

- Enter your information. Copy the following content for the Subject and Text fields.
Subject: Partner Connection for VRScheduler via HSAPI and add VRScheduler to ENET.
Text: Please connect the partner VRScheduler via HSAPI to my account. Please add VRScheduler as a network partner in EscapiaNet. My VRScheduler Contact is: Jill Mason - jill(@)vrscheduler.com
Step 2: Enable Partner and Permissions
Once your request has been accomodated by HomeAway (24-48 hours), log into your Escapia dashboard and add VRScheduler as a partner, then give the necessary permissions.
- Go to the HomeAway Partner Picker Page:
Instructions: https://support.escapia.com/articles/en_US/Article/HASW-HSAPI-Partner-Integration-Information?q=hsapi&subdir=partner - On the Edit Permissions page
- Check Enable Partner at the top.
- Check Can Access Unit Addresses at the top.
- Check the following methods access permisions:
- SearchUnitSummaries
- GetUnitByID
- SearchReservationSummaries
- GetReservationByNumber
- SearchOwners
Step 3: Choose properties to include in VRScheduler feed through EscapiaNET
- In Escapia navigate to: Admin Setup EscapiaNET Join Escapia NET I Agree. You may have to agree to the terms and conditions at this point.
- Find VRScheduler in the list and choose Unit Distribution
- Choose Operto Teams for each property you would like to include in the feed.
STEP 4: Enter your Escapia COID in Setup --> System Settings. Scroll down to the API Connections section.
If you are currently using Operto Teams and switching to HomeAway - Escapia from another property management system, follow the below steps
Step 5
Property Matching
Merge the HomeAway - Escapia feeds into previously setup properties.
Navigate to Setup --> Properties.
Filter by Region: Region not Assigned.
For each property, use the Merge Feed To dropdown and select the previously set up property
Merge the HomeAway - Escapia feeds into previously setup properties.
Navigate to Setup --> Properties.
Filter by Region: Region not Assigned.
For each property, use the Merge Feed To dropdown and select the previously set up property
Step 6
Master Calendar Review
With both feeds active, the new bookings should exactly match the old. The Master Calendar will allow you to easily review for import errors.
With both feeds active, the new bookings should exactly match the old. The Master Calendar will allow you to easily review for import errors.
Step 7
New Task updating
The new bookings created new tasks. Use the Scheduling Calendar to schedule the new tasks and upate any notes - to match the old tasks schedules and notes.
The new bookings created new tasks. Use the Scheduling Calendar to schedule the new tasks and upate any notes - to match the old tasks schedules and notes.
Step 8
Request old booking Removal
Email help-teams@operto.com to request your old bookings be removed from the calendar.
Email help-teams@operto.com to request your old bookings be removed from the calendar.
IMPORTANT
Check your Master Calendar for accurate properties and bookings.
Troubleshooting Tips:1. Search HomeAway - Escapia in our knowledgebase to see any specific statuses or requirements for import.
2. Use Setup --> Properties, Actions button, Request Pull from HomeAway - Escapia to retry the import.
3. Contact help-teams@operto.com so we can help to troubleshoot.